


 Feel free to hang out and lurk as long as you like. However, we would like to encourage you to
 Wasabi
0
I have a hard time bending over and kneeling because of previous back and knee surgery. It’s getting to a point that I can hardly stand up after just a few minuets bending over and kneeling. I decided that a lift would help lesson some of the strain on my back and knees when I work on my bike. My recent trip to Mexico where I had to remove my rear wheel four times in one day really did a job on my back and knees. It was the motivation I needed to quit looking and to just buy a lift.
I recently purchased the Kendon Motorcycle Stand –up Lift from cycle gear in Fort Worth Texas. I bought the cruiser version model # BLC107. The lift was at the store so I was able to take it home the same day. I paid 649.00 plus tax $53.62 for a total of $703.61. Not a great price but I have the option to return it if it doesn’t work out.
Space in my garage is limited so one of the features about this lift was that it can be folded up and stand upright in the garage.
So far I give it a grade of “C”.
I have two bikes, KLR650 and Suzuki Vstrom 1000. The first part of the report will focus on the KLR650.
Some features I like about the Kendon Lift.
It folds up and will take up little space
Has both manual pump handle and a air compressor powered lift mechanism
The front wheel chock can be removed.
Some feature I don’t like.
The instruction book has minimal information. It does not include any info about the compressor powered feature.
The chock is not designed to hold the bike up right without tie downs. It makes the loading of the bike a hazard to do with only one person. Most lifts I have used the chock held the tire tight so the bike could be held up right without tie downs.
The wheels that the lift rolls on are very small and look like they won’t last very long. Not very maneuverable in tight spaces.
The lift only has a 90 day warranty. For this amount of money I would expect a better warranty.
It is very awkward raising the lift to upright position because the lift will start to unfold if you don’t do it right.
The hose for the compressor is not located in a position that makes it easy to insure it won’t get in between the scissor rails and be damaged
The Release Valve Assembly that lowers the bike down is awkward to use and can come off the valve stem during the lowering process and cause the bike to fall rapidly to the ground.
So far I have only use the lift to raise the bike. I have not done not any real work on the bike while it was on the lift.
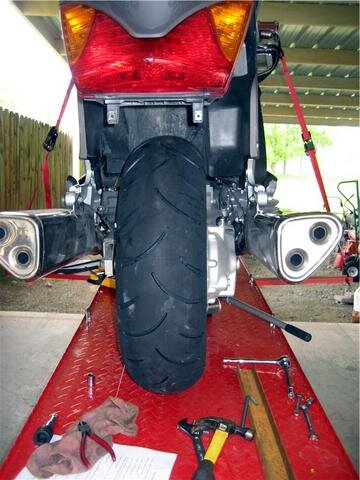
The lift lowered and making it ready to load the bike.


What it looks like raised

With the KLR


Some features
To raise and lower the bike the manual lever and release knob are located at the front of the lift.

There are four tie down hooks two in front two in back.


I find that in order to insure that the tie down straps don't come off the tie down connections during lowering the bike that these clip hooks work great.

When I first tried to lower the lift , the release knob connection was not connected correctly and the bike dropped very fast. After inspection I could see that this was a poor design and that I had to check this often to make sure it was connect before lowering the bike. Also, the way the lift is designed , when raising the bike the front straps will loosen so you must tighten them while raising the bike. Conversely, you must loosen the straps when the bike is lowered. Another reason the clip hooks on the front straps are so nice, they won’t fall off the lift connectors while raising the bike.
The release connector cable was disconnected, it has two small allen screws holding it on.

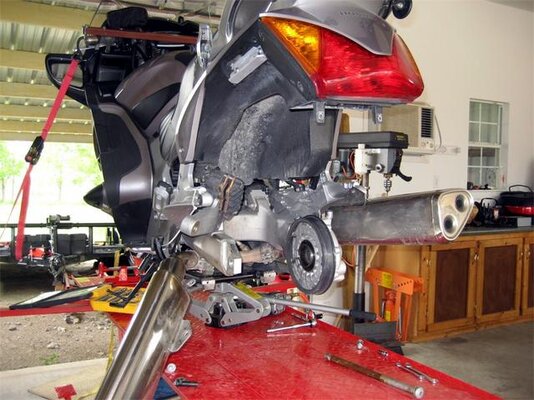
One of the features I most wanted was the ability to remove the wheels while on the lift. The instruction book requires that you use their Frame Jack, for an additional $128.00, to remove the tires while the bike is on the lift. I tested a scissor jack to lift the bike and it seemed to work. Here is what it looks like.

Rear wheel off the lift


Front off lift

The front chocked removed for easy access to wheel

The lift upright

Next I test the Vstrom
I recently purchased the Kendon Motorcycle Stand –up Lift from cycle gear in Fort Worth Texas. I bought the cruiser version model # BLC107. The lift was at the store so I was able to take it home the same day. I paid 649.00 plus tax $53.62 for a total of $703.61. Not a great price but I have the option to return it if it doesn’t work out.
Space in my garage is limited so one of the features about this lift was that it can be folded up and stand upright in the garage.
So far I give it a grade of “C”.
I have two bikes, KLR650 and Suzuki Vstrom 1000. The first part of the report will focus on the KLR650.
Some features I like about the Kendon Lift.
It folds up and will take up little space
Has both manual pump handle and a air compressor powered lift mechanism
The front wheel chock can be removed.
Some feature I don’t like.
The instruction book has minimal information. It does not include any info about the compressor powered feature.
The chock is not designed to hold the bike up right without tie downs. It makes the loading of the bike a hazard to do with only one person. Most lifts I have used the chock held the tire tight so the bike could be held up right without tie downs.
The wheels that the lift rolls on are very small and look like they won’t last very long. Not very maneuverable in tight spaces.
The lift only has a 90 day warranty. For this amount of money I would expect a better warranty.
It is very awkward raising the lift to upright position because the lift will start to unfold if you don’t do it right.
The hose for the compressor is not located in a position that makes it easy to insure it won’t get in between the scissor rails and be damaged
The Release Valve Assembly that lowers the bike down is awkward to use and can come off the valve stem during the lowering process and cause the bike to fall rapidly to the ground.
So far I have only use the lift to raise the bike. I have not done not any real work on the bike while it was on the lift.
The lift lowered and making it ready to load the bike.
What it looks like raised
With the KLR
Some features
To raise and lower the bike the manual lever and release knob are located at the front of the lift.
There are four tie down hooks two in front two in back.
I find that in order to insure that the tie down straps don't come off the tie down connections during lowering the bike that these clip hooks work great.
When I first tried to lower the lift , the release knob connection was not connected correctly and the bike dropped very fast. After inspection I could see that this was a poor design and that I had to check this often to make sure it was connect before lowering the bike. Also, the way the lift is designed , when raising the bike the front straps will loosen so you must tighten them while raising the bike. Conversely, you must loosen the straps when the bike is lowered. Another reason the clip hooks on the front straps are so nice, they won’t fall off the lift connectors while raising the bike.
The release connector cable was disconnected, it has two small allen screws holding it on.
One of the features I most wanted was the ability to remove the wheels while on the lift. The instruction book requires that you use their Frame Jack, for an additional $128.00, to remove the tires while the bike is on the lift. I tested a scissor jack to lift the bike and it seemed to work. Here is what it looks like.
Rear wheel off the lift
Front off lift
The front chocked removed for easy access to wheel
The lift upright
Next I test the Vstrom

")

 Personally, I would go with Western Manufacturing for the price and features.

 he's got a tyre changin' tool too, but I betcha still have to do the work eh?
 anyway, keep the shiny side up!