• Welcome to the Two Wheeled Texans community! Feel free to hang out and lurk as long as you like. However, we would like to encourage you to register so that you can join the community and use the numerous features on the site. After registering, don't forget to post up an introduction!

DRZ experts inside

Yes just the two M6 bolts and the cable..
There is a large diameter O ring that "seals"
the housing to the case.. That gets old and hard and make removal difficult.

Caution DO NOT DO THIS.. Use at your own risk, unintended pregnancy and blindness may occur.

A piece of wood like hunk of 2x4 and a heavy hammer to provide a single shock is often very effective.

BUT you need to drive the starter straight pout, not at an angle of the case can be damaged, and or the starter drive gear shaft bent

**** that packing tape ...

The hooligan is very hard to start when cold.
The starter sounds like gravel is in the starter housing.

I'm thinking the starter is dragging, pulling massive amps to spin and starving the coil for power.

An ebay replacement was $20.

But I'm having a heckuva time getting the starter out. It's just the 2 bolts and the power cable, right? It's loose and wiggles a bit, but just won't pop out.

Thought I might ask if I'm missing something before i hit it with a hammer ....
 
Oh, and I would look hard at the battery ground wire to the engine case for any signs of corrosion as well as the positive cable from battery to starter relay and relay to starter. Make sure you have good clean connections.
I would also check OHMs across the starter relay terminals when the button is pushed.. As well as voltage at the starter terminal vice voltage at battery.
The contacts inside the relay could be very worn and your not getting full voltage at the starter
 
Well alrighty ... I'll give it a "shot".

I've had a stiff belt of Rimfire, in order to stay warm, of course.
Courage and confidence are at an all-time high.


Edit ...

Success and I didn't break anything ... no blurred vision, but I am a bit nauseous ...
Sure wish I had an O-ring. Looks fine ... still soft. but another might as well ...
I doubt the local shop has one on the shelf.
 
Last edited:
And once again...

DRZ400S_PetcockRebuild_01-X3.jpg


The far diaphragm is what was on the bike.
The near diaphragm is in the rebuild kit.

Dimensionally, they are the same except for the plastic piece between the gaskets and the center component which is longer ... about the thickness of the plastic piece.

Good to go? Or wrong kit?
 
Good to go? Or wrong kit?


Answered my own question ... wrong kit.

O-ring that's seals the selection valve was too big

Sent from my SM-G900V using Tapatalk
 
Last edited:
Answered my own question ... wrong kit.

O-ring that's seals the selection valve was too big

Sent from my SM-G900V using Tapatalk

What brand rebuild did you buy?
If a OEM DRZ vac petcock

In K&L it should be
18-5038
In Outlaw Racing brand OR3440
 
Or ditch the Vac auto one and get a manual


FUEL COCK ASSY 1
5LP-24500-01-00
by Yamaha

$32.08 List Price
$21.29 37% OFF

$20.31
 
Last edited:
K&L 18-5038

Did they change at some point?

I have Yamaha Assembly on it now.
Thanks, Doug.
Inserted it backwards.
Not crazy about how I've had to route the fuel line in either orientation.

And turning the fuel on/off is kind of a pain.
 
Last edited:
Maybe the previous owner installed the petcock from another bike?
This poor bike has been exposed to some shade tree mechanican ...

Does the OEM piece have that plastic component sandwiched between the diaphragm gaskets?


You know ... I didn't want a basket case, but it appears I'm close to it.
 
Last edited:
Yes the OEM petcock has two rubber diaphragms, separated by a plastic spacer just like in your picture..
There are hundreds of vacuum petcock designs many that look very similar and dimensionally different.

The part in question is so cheap, i think It buy a know part and just move on. be it a OEM Suzuki DRZ petcock and a known fitting rebuild kit, or a non stock one like the Yamaha Raptor

Maybe the previous owner installed the petcock from another bike?
This poor bike has been exposed to some shade tree mechanican ...

Does the OEM piece have that plastic component sandwiched between the diaphragm gaskets?


You know ... I didn't want a basket case, but it appears I'm close to it.
 
So the K&L kit may've changed?

That plastic piece is not a part of the K&L kit.
 
So the K&L kit may've changed?

That plastic piece is not a part of the K&L kit.

The plastic piece is not a wear item and not included in any kit.

the diaphragm is is passed though the plastic spacer.
 
:eek2:

Gasket appears awfully delicate to thread it through that small hole.

One final question ... there is a degraded O-ring around the base petcock valve ... not the outer perimeter.
I'll get a pic

The kit has an O-ring, but is WAY too big (in circumference) to fit where the degraded ring sits.
It does appear to be sized properly for the perimeter of the valve.

So install the valve, place the ring in the seam where the valve fits inside the housing and install the plate over the top?

Does that make sense.
 
Last edited:
:eek2:

Gasket appears awfully delicate to thread it through that small hole.

That said, I have seen it damaged by having the screws over tightened and that user cracked the spacer... but that was user induced, not wear.

The "valve" (which is aluminum part with the O ring) does not fit though the spacer hole, so what you do is fold up the other sides diaphragm and pass it though the hole..
Easier to show then describe Id bet
 
Lemme back up a bit ... two separate concerns.

What I'm calling the petcock valve (front side - controls flow of fuel) was missing the O-ring. What I thought was a degraded o-ring was in fact a spring washer.

It had some corrosion/debris on it and was stuck in place. At a casual glance, it looked like an old o-ring in a grooved seat. But once I began cleaning, it became apparent.

There was no o-ring in the petcock housing ... probably the source of the leak.


In parallel, the diaphragm through the plastic spacer wasn't as sketchy as I visualized. I got a corner through and then began working my way around, carefully pulling the gasket through. The last cornet required the most "tugging".

So it's altogether and I thank you for your patience. I live in the boondocks and if I screw something up, I'm days away from a replacement. So I am probably way over-cautious.
 
So yet another issue ...

With the starter removed, I'm seeing gas pool in the valley. The carb is the obvious source, but can't locate it specifically.

I was told the carb had some sort of jet kit in it, but I'm not confident in the carb tech's work based upon other mickey mouse work I'm un red-necking.

Doug gave me a stock carb, but not 100% sure what has been done to it. So I'm unsure which carb to spend this repair kit I've got in my hand.
 
Grand son "toddling", Post op Dog watching, other three dogs needing fed, grandpup here as well, dinner part way made ....Im out of attention right now to read that and respond .....will after 50% or more go to sleep
 
Saw Sprocket's xRay ... here's hoping for a speedy recovery

Not to worry ... I'm forever in your debt.
 

Attachments

  • 9CF441F8-A2E0-40DD-A617-2D498BC816D9.jpg
    9CF441F8-A2E0-40DD-A617-2D498BC816D9.jpg
    43 KB · Views: 458
So yet another issue ...

With the starter removed, I'm seeing gas pool in the valley. The carb is the obvious source, but can't locate it specifically.

I was told the carb had some sort of jet kit in it, but I'm not confident in the carb tech's work based upon other mickey mouse work I'm un red-necking.

Doug gave me a stock carb, but not 100% sure what has been done to it. So I'm unsure which carb to spend this repair kit I've got in my hand.

Just to make sure I understand, both carbs are OEM BSR36 Mikuni carbs?
One being stock and one having a jet kit?


If that is correct, you can choose either one.. Jet kits for that carb are all replacement parts, no work is done to the body or parts that are retained to the carb
So a carb base, new "jet kit" and some service parts will work equally well in either carb you have from the sounds of it.

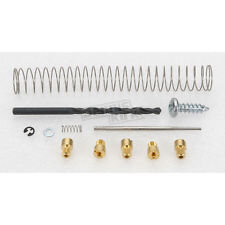
a "Jet Kit" is needle, clip, spring, and most times a drill bit and a sheet metal screw to remove the brass cover over the fuel screw
attachment.jpg


Add to the typical Jet kit a new float needle, seat and O ring VALVE-FLOAT
16030-S008 (though typically only the O ring is the issue)
The O ring itself can be had here
https://www.jetsrus.com/individual_parts/002_709_su.html

http://www.nichecycle.com/ncs/categ.../kv-10-o-ring-for-needle-valve-by-mikuni.html

DO you need to buy a $2.70 O ring from that place> NO.. you just have to find a cheaper source for a 7.75mm I.D. x 1.53mm Viton rubber O ring
 

Attachments

  • Jet kit.jpg
    Jet kit.jpg
    6.8 KB · Views: 448
Dang Mitch, you must be bored. Hee Hee. Got that title yet?

Actually, it's been rather therapeutic ...

No title yet. Must run in order to get an inspection.


So this carb you let me store at my shop ... what does it need in order to install it?
 
Mitch I think my old BSR36 was jetted for the Yosh pipe and 3X3 mod, so it ought to work perfectly on yours as is.
 
Back
Top